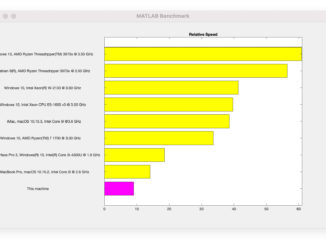
Posted by amida168 on March 1, 2008

Apple has unveiled a new line of Macbook and Macbook Pro this week. In addition to the new Intel Core 2 Duo Chip (Penryn), the biggest feature is the inclusion of the Multi-Touch trackpad.
With Multi-Touch, you can scroll, swipe, pinch and expand, rotate to manipulate text, photo and image. You can visit this page to see a demo of the Multi-Touch trackpad.
While looking for the information about the new MacBook, I was surprised to find that they are on sale already. MacMall offers $150.00 rebate, FREE shipping, FREE Parallels Desktop 3.0, FREE Epson Stylus Printer on several configurations of the new line-up. If you are a bargain hunter, you can buy the previous generation of MacBook at close-out price. Click the following link to go to the MacMall’s sale page.
SAVE up to $150 on the new MacBook Pro prices starting at $1844 + FREE Shipping after Rebate(s)! NOW WITH MULTI-TOUCH!

Posted in MacBook, OS X, Promotion | Comments Off
Posted by amida168 on November 20, 2007
[Updated: 3/28/2008]
MacBook Pros feature the Intel Core 2 Duo processor; Multi-Touch trackpad technology; a discrete, powerful graphics processor; a choice of two display sizes; advanced connectivity; and a powerful architecture. It is the epitome of mobile computing–and it can serve as a desktop replacement as well.
Amazon now offers $150.00 rebate for MacBook Pro’s. Click here
to go to the the sale page on Amazon.
Alternatively, MacMall offers $150.00 rebate, FREE shipping, FREE Parallels Desktop 3.0, FREE Epson Stylus Printer on several configurations of the new line-up. Click the following link to go to the MacMall’s sale page.
SAVE up to $150 on the new MacBook Pro prices starting at $1844 + FREE Shipping after Rebate(s)! NOW WITH MULTI-TOUCH!

Posted in MacBook, Promotion | Comments Off
Posted by amida168 on March 26, 2007
The MacBook has no eject button under Vista. The eject key doesn’t work either. To eject CD-ROM, you need to use Windows Explorer. Once you have Windows Explorer opened up, you need to right click on the optical drive and select “eject” assuming you have an external mouse. If not, you will need to run a 3rd party utility like applemouse.exe to simulate the right mouse click. Anyway, there are multiple steps involved just to eject CD-ROM.
I found a VBscript to eject CD-ROM. When I tried the script on my MacBook, it didn’t work. After experimenting a bit, I got the code to work. Here is the modified version.
Const CDROM = 4
For Each d in CreateObject("Scripting.FileSystemObject").Drives
If d.DriveType = CDROM Then
Eject d.DriveLetter & ":\"
End If
Next
Sub Eject(sDriveLetter)
Dim ssfDrives
Dim oShell
ssfDrives = 17
CreateObject("Shell.Application")_
.Namespace(ssfDrives).ParseName(sDriveLetter).InvokeVerb("Eject")
End Sub
I created a shortcut to this script on the Quick Launch bar. Now, I can eject CD-ROM with just one mouse click. Also, remember that the items on the Quick Launch bar have keyboard shortcuts assigned to them. The keyboard shortcut is Windows key + Number where the number represents the order of the item on the Quick Launch bar. For example, the script to eject CD-ROM is the 7th item on the Quick Launch bar. I can use Windows key + 7 to invoke the script to eject the CD-ROM.
Posted in MacBook, Vista | 5 Comments »
Posted by amida168 on March 22, 2007
Apple’s Boot Camp Assist 1.1.2 b includes SigmaTel audio driver for MacBook. However, when I first installed it, the microphone was not working.
I first thought the microphone driver is not compatible with Vista. Later, I found that it’s not a compatibility problem. The microphone is just not enabled by default. Here is how you enable it.
- Open up Control Panel. Go to Ease of Access.

- Click on Set up a microphone.

- Follow the wizard to set up your microphone as a desktop microphone.


Posted in MacBook, Vista, Windows | Leave a Comment »
Posted by amida168 on March 21, 2007
I just upgraded my MacBook from Vista Business to Vista Ultimate. After the upgrade, the audio device is not working any more. I tried to uninstall the audio device and re-install it several times and it didn’t work. I then try to google for solution, and what do you know, I found the solution in my own blog!
A reader left a comment in my early post about Vista RC1 on MacBook. Here is what he said.
For those of you having issues with MacBook sound on Vista after an upgrade from an earlier version of Vista (and maybe XP – not sure), there is a bug with the Sigmatel driver installation package that affects the upgrade scenario. It will look like the install worked, but you’ll get the error “No Audio Output Device Installed” as a tooltip from the system tray speaker icon, and in the Control Panel sound settings dialog. You can get around this by going to Device Manager, *uninstalling* the Sigmatel audio that appears under sound devices (choose to remove the software too, this won’t remove the installer, just the copied driver), and running the installer’s setup.exe (as Administrator).
Posted in MacBook, Vista | 1 Comment »
Posted by amida168 on February 21, 2007
Microsoft has just released Virtual PC 2007 and it’s available for free. You can download it here.
CD Device
The first problem I ran into is the default virtual machine tried to boot the machine using secondary controller which doesn’t exist on my test machine. To use the main CD/DVD drive, click on CD menu and select Use Physical Drive D: . You then need to reset the virtual machine. Do this by clicking on Action menu and select Reset .
Virtualization
This version of Virtual PC supports hardware virtualization. It’s a great performance improvement over the old Virtual PC. However, if you install it on an older machine without hardware virtualization, there is no noticeable performance boost. I first installed Virtual PC 2007 on my Ferrari 3400 which has no virtualization support. The installation process is painfully slow. It took over 4 hours to install Windows XP. I then try it on my MacBook and it took only 40 minutes to install Windows XP.
Host Key
During installation, virtual machine has control of mouse and keyboard, I cannot use my computer for other purpose. I googled quite a bit trying to find a way to escape the mouse and keyboard. I was not succesful finding the right key combination. I do find something about host key, but what is a host key? Finally, I was able to use good old Ctrl+Alt+Del and click Cancel to return the control of mouse and keyboard to the host system. I later learned from the online help that the default host key is right Alt key. You can change that by clicking on File menu on Virtual PC Console and select Options. This is helpful, because there is no right Alt key for MacBook. If you run your virtual machine in windowed mode, you can use host key + left or right arrow to switch between the virtual machines and host system. Host key is also useful when you run the guest OS in full screen mode because the menu is hidden. Here is a short list of important keyboard combinations.
- Host key+Enter Full-screen mode
- Host key+Del Ctrl+Alt+Del for guest OS
- Host key+E Change settings
- Host key+I Install Virtual Machine Additions
Networking
If you create a default virtual machine, after installation the networking does not work. Virtual PC offers you different ways for virtual machine to connect to the network. I use NAT which is easy to setup and secured. To use NAT, click on Edit menu and select Settings. Click on Networking and change Adapter 1 to Shared networking (NAT) .
Virtual Machine Additions
Don’t forget to install Virtual Machine Additions after installation of the guest OS. It is a set of features that improve integration of the host and the guest OSs. It also provides features like drag and drop between host and guest OSs. To install Virtual Machine Additions, click on Action menu and select Install or Update Virtual Machine Additions . Follow the installation wizard to finish it.
Share Folder
Drag and drop is good for occasional file sharing. However, if you have a lot of file to share, you’ll have to setup share folder. To do this, right click on the folder icon on the lower right corner of the guest OS and select Share Folder… .
Posted in MacBook, Vista, Windows | 13 Comments »
Posted by amida168 on September 15, 2006
When I heard that RC1 is available for download, I downloaded it and installed it on my MacBook right away. Compared to my Vista Beta 2’s installation note, I found the following favorable points.
- The installation is a breeze. You don’t need to delete the EFI partition any more. There is also no need to repair the installation. Just follow Boot Camp’s instruction to install Vista RC 1.
- After installation, the Startup Disk in OS X’s System Preferences is still working. You can set the default startup disk to either Vista or OS X at ease. It was a major hassle for Vista Beta 2 if you ever want to switch between the startup disks.
- The Intel 945GM driver is now WDDM certified. You don’t have to use the Lakeport driver to use Aero theme.
- Waking up from sleep or hibernation is more reliable and faster.
And of course, there are still problems with drivers. With Boot Camp 1.1, you have drivers for microphone and iSight. However, these drivers still don’t work under Vista RC1. There is also no way to adjust the screen brightness. There is also a weird problem with my clock. It’s almost always wrong everytime I reboot the machine.
Posted in MacBook, Vista, Windows | 17 Comments »
Posted by amida168 on August 23, 2006
A little background before I go into the details of this guide. If you install Vista Beta 2 on a MacBook using BootCamp Assistant, you cannot set the default startup disk at ease. You can only set Mac OS X as the default startup disk using the Startup Disk tool in System Preferences. You cannot set the Vista Beta 2 as the startup disk once you set the MacBook’s default startup disk as Mac OS X.
nvram is a command line utility to manage firmware NVRAM varialbles. Even though MacBook uses EFI instead of OpenFirmware, it still uses NVRAM to store boot information. After some experiments, I was able to use nvram to set startup disk to either Mac OS X partition or Vista Beta 2 partition. The following steps are for a dual boot machine whose startup disk is Vista Beta 2.
- Boot the machine to Mac OS X.
- Open up Terminal application and type in
sudo bash
to get root access.
- In the Terminal window, type in the following to save the Vista boot information to the windows.nvram file.
nvram -p > windows.nvram
- Open the Startup Disk tool in System Preferences and set the startup disk to Mac OS X.
- Reboot the machine to Mac OS X.
- Repeat step 2.
- In the Terminal window, type in the following to save the Mac OS X boot information to the mac.nvram file.
nvram -p > mac.nvram
Now you have two NVRAM files: windows.nvram and mac.nvram. If you want to set the default startup disk, just do the steps 1 ~ 2 and the following:
- Set startup disk to Vista Beta 2
nvram -f windows.nvram
- Set startup disk to Mac OS X
nvram -f mac.nvram
When you use the nvram command with -f switch, you might get an error message like this:
nvram: Error (-1) setting variable - 'efi-boot-device-data'
It’s OK. The system boots to the OS as we specified regardless the error.
Posted in MacBook, Vista | 1 Comment »
Posted by amida168 on July 24, 2006
UPDATE: [The trick detailed below only works if your default startup disk is set to Mac OS X. The boot.efi file only let you reboot the machine, it DOES NOT boot the system to Mac OS X partition. My MacBook was set to boot to OS X by default when I tried it, therefore I got the false sense that by booting the boot.efi, I actually boot the machine to OS X. I am sorry for the misinformation. I'll research more about how to actually use Vista's boot manager to boot OS X. What I really wanted to achieve is to have a boot manager to dual boot Vista and OS X at the startup without holding the Option key, and there is a perfect program for that. It's called rEFIt.]
Windows Vista comes with a new boot manager, that is very flexible. I thought it would be nice if I could use that to specify an entry for Mac OS X. However, the technology is new and I cannot find many documentations about it. The FAQ in Microsoft’s web site does not tell you how to create a boot loader for Mac OS X. It only tells you how to create a boot loader for legacy systems like Windows XP.
I then found out that people are using a chain0 file with Vista’s boot manager to dual boot OS X and Vista for the OSx86 project. I tried that, but it did not work. The problem is that the chain0 file is not for booting Mac OS X on MacBook. What I really need is already on my MacBook. It’s called boot.efi and it’s under /usr/standalone/i386/ . The file is hidden from Finder. You will need to use Terminal application to copy it. Here are the steps.
- Boot to Mac OS X. Open Terminal application and type in the following to copy boot.efi to the Desktop.
cp /usr/standalone/i386/boot.efi ~/Desktop/
- Copy the boot.efi file to a USB key.
- Boot to Vista and copy the boot.efi file from the USB key to C:\
- Now open Command Prompt as administrator. If you don’t know how to do this, please follow the steps 1~3 in this post.
- We need to determine if you have a legacy boot loader in your system. Type in the command in the Command Prompt window.
bcdedit /enum all | find "{ntldr}"
If this command returns
identifier {ntldr}
, that means you already have a legacy boot loader in your system. Follow step 6 and skip step 7. If the command didn’t return anything, skip step 6 and follow step 7.
- Type in the following to copy the legacy boot loader.
bcdedit /copy {ntldr} /d "Mac OS X"
bcdedit /set {YOUR-GUID-HERE} device boot
bcdedit /set {YOUR-GUID-HERE} path \\boot.efi
bcdedit /displayorder {YOUR-GUID-HERE} /addlast
Note that you need to replace YOUR-GUID-HERE with the actual GUID returned by the first command. To illustrate this, the following are the actual commands and responses.
C:>bcdedit /copy {ntldr} /d "Mac OS X"
The entry was successfully copied to {bcfa924e-07e0-11db-9d86-accf6fd346a1}.
C:>bcdedit /set {bcfa924e-07e0-11db-9d86-accf6fd346a1} device boot
The operation completed successfully.
C:>bcdedit /set {bcfa924e-07e0-11db-9d86-accf6fd346a1} path \\boot.efi
The operation completed successfully.
C:>bcdedit /displayorder {bcfa924e-07e0-11db-9d86-accf6fd346a1} /addlast
The operation completed successfully.
- Type in the following to create a new legacy boot loader.
bcdedit /create {ntldr} /d "Mac OS X"
bcdedit /set {ntldr} device boot
bcdedit /set {ntldr} path \\boot.efi
bcdedit /displayorder {ntldr} /addlast
Now you can see there is an entry for “Mac OS X” whenever you boot to Vista, select that and you can boot to Mac OS X.

Find deals on Amazon.com
Notebook Computers
Electronics
iPod
MacBook
MacPro
Posted in MacBook, Vista | 21 Comments »
Posted by amida168 on July 14, 2006
Posted in MacBook, Vista | 3 Comments »