AI hand generation is often flawed due to the intricate anatomy of hands, leading to distorted or inaccurate results. Inpainting helps fix these issues by allowing selective regeneration of problem areas, but it can be challenging to get right. The difficulty lies in blending new content seamlessly with the existing image, maintaining consistent lighting and proportions, especially in complex areas like hands. I recently discovered a new inpainting technique that significantly improves hand generation, and I’m excited to share the details in this article.
I am going to use Forge Web UI to demonstrate the technique, but it should apply to other platforms.
- Click on img2img tab and then inpaint sub tab
- Drag the image you want to inpaint to the canvas
- Inpaint the hand and additionally inpaint a small dot near the elbow
- Change the prompt to perfect hand.
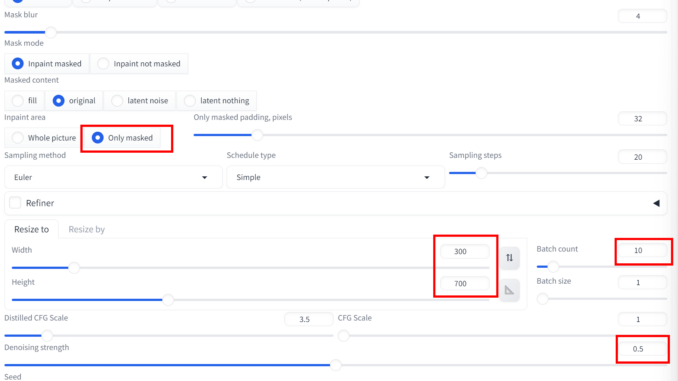
- Adjust the parameters according to the screenshot. Note that the size should be large enough to cover both the inpainted hand and the small dot near the elbow. Denoising strenght of 0.5 is a good starting point to try. If the original hand is already good, use a strength like 0.3 ~ 0.4 to fine tune it. If the original hand is really bad, use 0.6 ~ 0.7.
- Click on Generate with a batch size of 10 to inpaint the hand. I usaully get good results the first try.
Give it a try and let us know if this works for you.
This post may contain affiliated links. When you click on the link and purchase a product, we receive a small commision to keep us running. Thanks.


Leave a Reply